Why Greenhouses Need a Floor (and other building considerations) – 10 Types Explained
Greenhouses are used for protecting plants. They not only guard against too much cold or heat, but they guard against pests. The materials for the construction and flooring of your greenhouse are important, too. Yes, flooring! There are several types of flooring available, each with their pros and cons.
What types of flooring can a greenhouse have? Here are 10 greenhouse flooring options:
- Concrete
- Wood
- Lava and landscape
- Mulch and pine needles
- Brick / Pavers
- Rubber
- Fabric
- Vinyl tiles
- Soil
- Gravel or pea stones
Your greenhouse flooring can help or hinder you. It is the foundation of your greenhouse. Consider your options and choose what will meet your needs and budget. Below is an explanation of the types of flooring available and how you can use it to help your plants thrive.
Why Your Greenhouse Needs a Floor
A greenhouse floor really just needs to be a surface that covers the bare soil to keep the greenhouse clean and prevent weeds and pests from finding their way inside. It also helps maintain the temperature of the greenhouse, especially if you chose to insulate it first.
The floor should also allow for good drainage, as watering is going to be a regular occurrence within the greenhouse. In addition, some flooring options such as stone can help sustain humidity levels within the greenhouse.
And, of course, if you’ll be spending as much time in your greenhouse as we hope you will, you’ll want a comfortable and level surface to walk and stand on.
10 Types of Greenhouse Floorings and Why They Work
Concrete
Concrete is an ideal flooring. If installed with the right slope, it has great drainage. There are several other reasons to choose concrete. They include:
- Easy to clean by sweeping or hosing off
- Easy to keep potting stands and benches level and stable
- The light color reflects heat and light during the day
One drawback is that it can be uncomfortable to stand on for any length of time. You might want to place some rubber matting in front of areas where you stand the most But watch that mold doesn’t develop under the matting. And, of course, wear very comfortable shoes out there.
Another negative of concrete could be the expense. It’s one of the most expensive types of flooring to install, but it’s easily the most durable.
Wood
One good option for flooring is wood. Before a wood floor is installed, the dirt floor is usually filled with three to four inches of gravel. The boards and stone are placed over a weed cloth.
- Wooden flooring is easy to clean
- Wood helps contribute to humidity, offering an added benefit for your plants.
When you spray water on the wooden planks, it adds humidity. This is great during the summer months. Wood can be an expensive option – and you have to be sure it’s waterproofed – but it will last a long time and look beautiful with proper care.
Lava Rock and Landscape
There are many advantages to lava rock and landscape flooring. The rocks look very attractive and offer many benefits.
- They are porous and absorb water
- Your plants will enjoy the humidity from the water
- It will reflect the light during the day
- It radiates heat at night
They also make your greenhouse quite attractive. However, they are also quite expensive, depending on how large the greenhouse is.
Mulch and Pine Needles
Although these are budget-friendly and the least expensive way to go, they’re not durable, and can harbor pests and pathogens. You will not be able to keep them clean, and they decompose quickly. They will need to be replaced periodically. In the long run, this may end up being an expensive way to go. While it is an option, it’s not recommended.
Brick
Using sand as a base, bricks make a lovely flooring for your greenhouse. Squirting off your brick with the hose is beneficial to your plants. Like other rocks, because bricks are porous, they absorb moisture and add humidity to the air. They also retain heat.
Some people build their greenhouses without flooring but place brick or pavers down the aisle to walk on. Once more, make sure you lay sand down as a base.
Rubber
This is a great choice for flooring. It will be comfortable for both walking and standing. Rubber flooring comes in both squares and rolls.
It’s more economical to buy the rolls if you want to cover a long aisle. The rolls are also easier to install, and they are easy to keep clean. Another great advantage is that they are easy to repair. If a section becomes worn or damaged, that section can be cut and replaced with a new piece.
Fabric
Believe it or not, fabric, such as heavy burlap, is an option. It acts as a separation layer from the dirt. It also acts as a weed barrier but will benefit from weed paper placed beneath it first. Fabric is UV resistant and withstands high traffic.
Vinyl Tiles
These are starting to become popular. There are quite a variety of styles to choose from. They clean well and have good drainage. Because they are easy to walk on, they can be placed over the entire area or used as a path.
Soil
Yes, you can just use old fashioned soil as your flooring. This is good for the plants because it allows their roots to grow deeper. However, over time it can be messy and turn into an inconvenience for you. So, if you want to use soil, you might want to put pavers or rubber down the aisles.
Gravel or pea stones
This is a basic and inexpensive greenhouse floor. The drainage is good. But unfortunately, it’s not always comfortable to stand or walk on. You also will have some difficulty keeping it clean. That is why some people set pavers on the frequently-traveled paths and aisles.
Is Permanent or Non-Permanent Flooring Better?
Permanent flooring can be a challenge. Permanent flooring is:
- Concrete
- Brick
- Wood
These can be a challenge. Concrete and bricks can be uncomfortable to stand on. Although you can use matting to counter this, it adds to the expense. You will also have to worry about mildew or mold growing under these mats. You also must make sure that the permanent flooring is installed correctly. If it isn’t, there may be drainage problems, which can wreck your investment.
Wooden flooring is considered “permanent,” but it really will only last as long as it is weather-proofed and taken care of well. The average lifespan of a wooden greenhouse floor is about 10 years.
With permanent flooring you are totally committed. If you don’t like it, you will have to go to a big expense to change it out. It isn’t flexible.
Non-permanent flooring offers you flexibility. Some non-permanent flooring includes:
- Lava and landscape
- Soil
- Fabric
- Rubber
- Mulch and pine needles
- Vinyl tiles
Most non-permanent flooring options can be less expensive. You can also change it around according to your evolving needs. But it is less durable than permanent flooring. As a result, it will need to be changed more often. This ultimately could increase the expense.
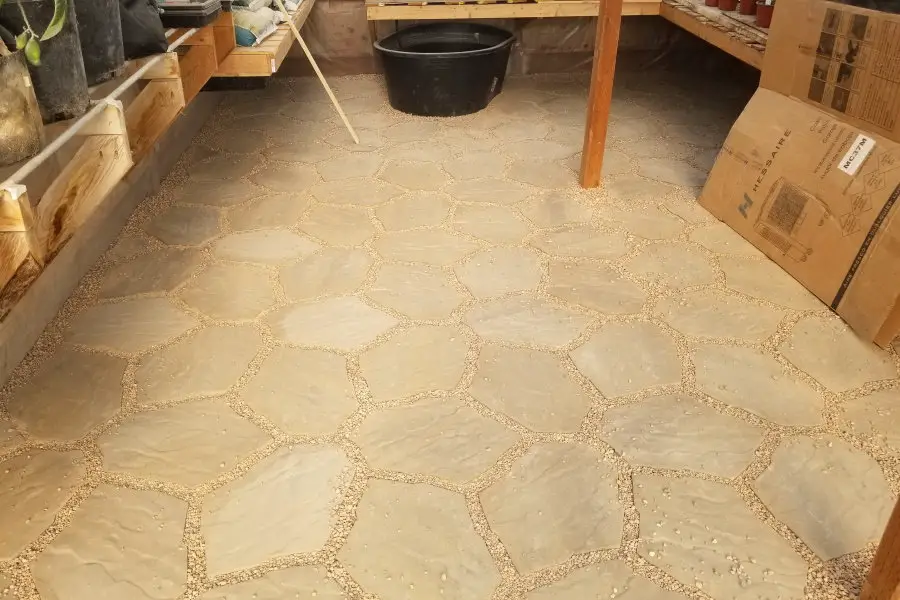
How to Build a Basic Greenhouse Floor
The first thing you do before constructing a greenhouse is to build the floor. The floor will primarily depend on whether you are building a temporary or permanent greenhouse. This example uses pea stones as the base.
The tools you need will include:
- 4 stakes
- hammer
- twine
- Shovel
- Measuring tape
- Level
- Weed block
- Pea stones
Constructing a floor isn’t difficult. It’s within your reach if you don’t mind some physical work. The steps include:
- Measuring
- Hammer stakes
- Digging
- Laying weed block
- Pea stones
- Measuring
- You will need to measure the width and length of the area you plan for your greenhouse.
- Hammer stakes
- Place a stake in each corner of your outlined greenhouse. Hammer them into the ground. Outline the perimeter by tying the twine around the stakes.
- Digging
- Locate the highest point on the ground in the designated area. Starting at the highest point, dig. You’ll want to create a level area. This will be your floor. Use your level. Regardless of what flooring you ultimately use, you want it to be level.
- Laying weed block
- Lay the weed block on the newly dug out floor. This will prevent weeds and grass from growing.
- Pea stones
- Use the pea stones to cover the weed block. It will not only hold the weed block down but create excellent drainage.
This basic base can stand as the foundation on several different floors. For instance, you can lay boards on it for a wooden floor. Brick could also be installed. Or if you wish, you could use the rubber mats.
Installing A Concrete Floor
The tools for a concrete floor that you’ll need include:
- Measuring tape
- Level
- 4 stakes
- Hammer
- Twine
- Shovel
- 4 pressure-treated one foot long two by two posts
- 4 pressure-treated two by four-inch boards
- Power drill
- Deck screws
- Concrete mix
The steps to building a concrete floor are basically the same as building a basic floor. You’ll need to plan and build the concrete floor before you build the structure. The steps include:
- Measuring
- Hammer stakes
- Digging
- Place posts
- Lay boards
- Pour concrete
- Measuring
- The greenhouse perimeter must be measured.
- Hammer stakes
- Hammer a stake in each corner. Outline the greenhouse by tying twine around the stakes
- Digging
- You will want to level the area. But in this instance, you will dig down six inches. Use your level. Once you have this dug, dig four holes at the corners. These should be eight inches deep.
- Place posts
- Insert one-foot long posts into each of the holes that you have dug. Check that they are straight with your level. Once you have determined that they are straight, pour some concrete into the holes. Let it set overnight.
- Lay boards
- Lay the boards on their edges around the perimeter of the dugout area. Drill the boards into the posts. Make sure they’re on the outside of the post. You are creating a form or box by doing this.
- Pour concrete
- Pour the concrete into the area. It should come halfway up the boards. This will make it around two inches thick. Let it set overnight.
We’ve established that there are a lot of options for greenhouse floors and now you know why it’s important to have one. But, why have a greenhouse in the first place?
Why Should a Gardner Have a Greenhouse?
If you are an avid gardener, you might want to consider building a greenhouse. In seasonal climates, it can extend your growing season. A greenhouse can also allow you to grow a greater variety of plants. Other benefits to having a greenhouse include:
- Flowers all year round
- Fresh vegetables, fruit, etc.
- Repels insects and other pests
- Able to start seedlings and then transplant into the outside garden
- Protects plants
- Continuous garden
- Save money from having to buy new plants
- A relaxing outdoor haven to enjoy
Why Shouldn’t a Gardener Have a Greenhouse?
The biggest reason could possibly be your budget or how it fits in aesthetically. Some reasons for foregoing a greenhouse include:
- Building expense
- Heating expense
- Constant maintenance
- Increased utilities
- Aesthetics of overall garden
Types of Greenhouses
Greenhouses are also called hothouses. The building is mostly made of transparent material. There are several popular styles to choose from. They include:
- Lean-to
- Gothic Arch
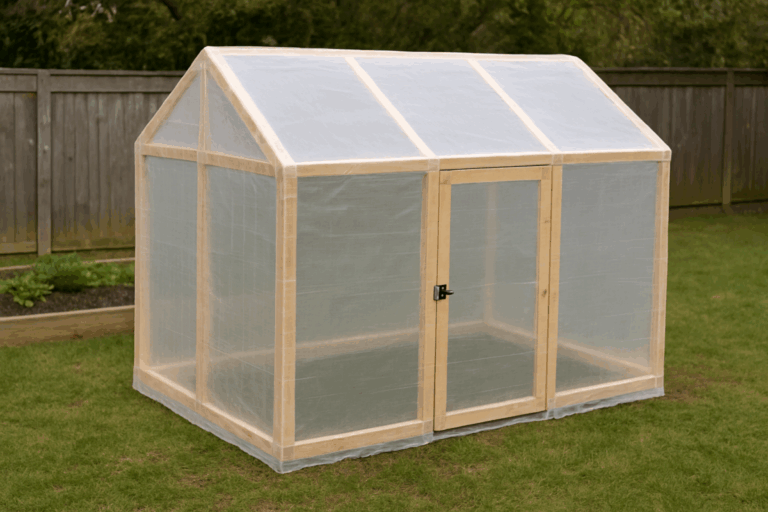
- A-Frame
- Gable roof
There are different versions of each of these. But the basic design remains the same. All of these are permanent or semi-permanent structures.
- Lean-to
- This is built against the side of another building. It has a sloping roof because it shares a wall with another structure. You can build the greenhouse against your home. If you go through the expense of adding a walk-through, you’ll be able to walk out into your greenhouse without going outside.
- Connecting utilities will be easier and less expensive since the lean-to is close to the house. Heat is also a positive factor. The wall of your home will provide some insulation and heat to your lean-to.
- Although you may think building only three walls is less expensive than a four-wall greenhouse, that’s not the case. You won’t be spending money on all the walls, but you will have the expense of the necessary support. Support for a lean-to is specialized and costly.
- The foundation for the lean-to may also be expensive. For aesthetic and practical reasons, you will want the foundation to match the existing structure. You also may need a building permit.
- Gothic Arch
- The Gothic arch greenhouse looks like the name says. It’s a building in the shape of an arch. It’s straightforward and very lovely. But beyond aesthetics, there are numerous reasons to choose a Gothic arch design. Some of these reasons are:
- No need for trusses- Trusses are basically rafters or struts that give support. In a standard greenhouse, the truss would support the roof. But a Gothic arch greenhouse doesn’t need this kind of support. Because of this, it requires less material. This reduces costs. It also makes construction quicker.
- Long-lasting—This style holds up well against high winds or snowfall. The shape of the roof allows precipitation or debris to run off. As a result, there is less damage to the structure.
- Flexible design—You have flexibility with the installation. You can set the structure on the ground level or on a high foundation. You have a choice.
- Overhead space—You’ll gain height because of the center’s high ridge. This will not only create headroom for you but will allow you to grow taller plants.
- A-Frame
- This is easy to set up. You just combine the roof and sidewalls in the shape of an “A.” It’s simple. The A-frame will save you on construction materials. Two major drawbacks are the small growing area and potential air circulation problems in the corners. You also will not have as much headroom that you receive with the other styles.
- Gable Roof
- This is one of the most prevalent types. The gable roof receives the most light and provides much-needed headroom. This is desirable not only for standing but for growing tall plants. It’s a simple design so you will be able to build it yourself. Prefabricated ones are available.
Want some more insight to help choose your shape? Check out this guide from the Agricultural Extension Service at the University of Tennessee.
Are Plants Better Off in a Greenhouse?
Plants do grow and flourish better in a controlled environment. Some would say, because it creates a more comfortable work environment, that the grower also does better. There are several reasons why a greenhouse is a controlled environment. They include:
- Carbon dioxide intake
- Reduced diseases
- Reduced pests
- Humidity
- Temperature
- Carbon dioxide intake
- Using fans to move the carbon dioxide around. The strong airflow will greatly help your plants flourish. Fans placed appropriately around your plants create a concentration of carbon dioxide. Some of the benefits to your plants are:
- Stronger stems
- Early flowering
- Bigger leaves
- Early fruiting
- Make sure you have outside air circulating inside. Because you don’t want your plants to use up all their carbon dioxide, replenishing fresh air is important.
- Using fans to move the carbon dioxide around. The strong airflow will greatly help your plants flourish. Fans placed appropriately around your plants create a concentration of carbon dioxide. Some of the benefits to your plants are:
- Reduced diseases
- You will be basically using sterile soil with your greenhouse plants. This is better than what the plants use in your outdoor garden. Your plants won’t be bothered with:
- Fungi
- Bacteria
- Because your plants won’t have these harmful pathogens, they’ll be more bountiful.
- You will be basically using sterile soil with your greenhouse plants. This is better than what the plants use in your outdoor garden. Your plants won’t be bothered with:
- Reduced pests
- Borers, like beetles, can wreak havoc on plants. Your greenhouse should give your plants protection from such pests that flourish in an outside environment.
- Humidity
- Outdoor plants only have soil moisture to live on during drought conditions. This is called water stress. The results are:
- Stunted growth
- Reduced resistance to pests
- Reduced resistance to disease
- Less fruiting
- Less flowering
- When a humid environment is provided, it reduces water stress and lets each plant work solely on flowering and fruiting.
- Outdoor plants only have soil moisture to live on during drought conditions. This is called water stress. The results are:
- Temperature
- Between night and day, there’s often a wide fluctuation in temperature for outdoor plants. Plants don’t do well in these temperature swings. They become stressed and sometimes stunted.
- With a climate-controlled greenhouse, you can maintain a consistent temperature all year. A way to help you maintain an even temperature throughout a twenty-four-hour period is using timers. Set your heaters on timers.
- The outside temperature usually cools at night. You know you’ll have to have your heaters adjust to this change. The timers will help you do this.
How Big Should a Greenhouse Be?
There are several factors in determining how big your greenhouse should be.
- How many plants do you want
- Heating and cooling capacity
- How much do you want to spend
Once you address these three factors, it becomes easier to choose a size for your greenhouse.
- How many plants do you want
- Both the size and the shape of the greenhouse will determine how many plants you can fit into it. And remember, it’s not just plants that you will need to have space for. You’ll want benches or tables for your small plants. You will also need enough space for:
- Soil
- Hoses
- Watering cans
- Hoes
- Tools
- Pots
- And more
- What size are these plants going to be? If you’re planning on growing flowers, that’s a different need then if you want to grow corn or small fruit trees. Larger greenhouses give the tall plants more ventilation over their tops.
- Consider your long-term goals. Where do you see your garden going? You might want to start with small plants and then go bigger later. You’ll need to think about that when making your greenhouse plans.
- Both the size and the shape of the greenhouse will determine how many plants you can fit into it. And remember, it’s not just plants that you will need to have space for. You’ll want benches or tables for your small plants. You will also need enough space for:
- Heating and cooling capacity
- Small greenhouses heat up and cool down faster than the larger ones. Larger air masses disburse heat more efficiently than a dense group of molecules in a small greenhouse. Because the bigger greenhouses maintain a more constant temperature, they ultimately are more efficient to heat.
- How much do you want to spend?
- Keep in mind that building the greenhouse is only the beginning. There are multiple costs to factor in. Some of these expenses include:
- Buying greenhouse construction materials
- Foundation
- Installing greenhouse
- Wiring for electricity
- Plumbing for water
- Heaters
- Automatic vents
- Benches
- Tools
- Soil
- Seeds or plants
- This is only the initial investment. You will also have maintenance and monthly utilities to pay.
- Another expenditure that you might not be considering is your time. It takes daily work to maintain a greenhouse garden. And if you go on vacation, you’ll need someone to cover for you.
- Keep in mind that building the greenhouse is only the beginning. There are multiple costs to factor in. Some of these expenses include:
Alternatives to Greenhouses
Whether you’re a professional or an amateur gardener, an extended growing season is always attractive. But not everyone wants a permanent structure on their property.
High Tunnel Greenhouse
A high tunnel or hoop house like this one on Amazon might be the way to go for you. Instead of a greenhouse, you’ll have a protected growing area. The benefits of a high tunnel over a greenhouse are:
- Lighter
- More mobile
- More flexible
- More versatile
- Larger
You can plant in the ground and place the high tunnel over them. The high tunnel is lightweight and can easily be moved. It doesn’t have a foundation so it can be installed quickly. It is often used on commercial farms.
But if you have a lot of land and want to extend your growing season in an easy, inexpensive manner, the high tunnel may be an ideal alternative.
Because the high tunnel is larger and higher than a greenhouse, you’ll be able to drive your farm equipment into it. Some equipment you’ll be able to use in it are:
- Tractors
- Tillers
- Tall farm machinery
If the high tunnel seems a little big to you, consider the hoop house.
Hoop Houses
These are small, easily movable, high tunnels. These don’t require much. They can forego the usual foundations and environmental controls.
These are easy to build yourself and can be installed quickly. Place them over an existing plant bed. Or you can place it over an area you would like to cultivate. Take a few hoop houses and cover several areas. It will make for a nice grouping. They’re small so you can put them just about anywhere.
Greenhouse, High Tunnel and Hoop Houses Kits Available
There are many kits available that will give you inexpensive options for your garden. Take a look at some choices available.
- MellcomTunnel
- The Mellcom Tunnel has eight roll-up windows with netting to allow cross ventilation and climate control. The tough PE plastic cover protects plants but allows sunlight to pass through. The cover easily attaches to the frame. The zipped roll-up door can easily give you access to the inside or you can attach it to stay open.
- Palram HGK 142 Glory Greenhouse
- The Palram Greenhouse has a thick polycarbonate roof and side panels. It’s virtually unbreakable. It also blocks 99.9% of harmful UV rays. This greenhouse has a reinforced aluminum frame. This package includes these features and more:
- Two roof vents
- Automatic vent openers
- Plant hangers
- Integrated rain gutters
- It comes with a 10-year limited warranty.
- The Palram Greenhouse has a thick polycarbonate roof and side panels. It’s virtually unbreakable. It also blocks 99.9% of harmful UV rays. This greenhouse has a reinforced aluminum frame. This package includes these features and more:
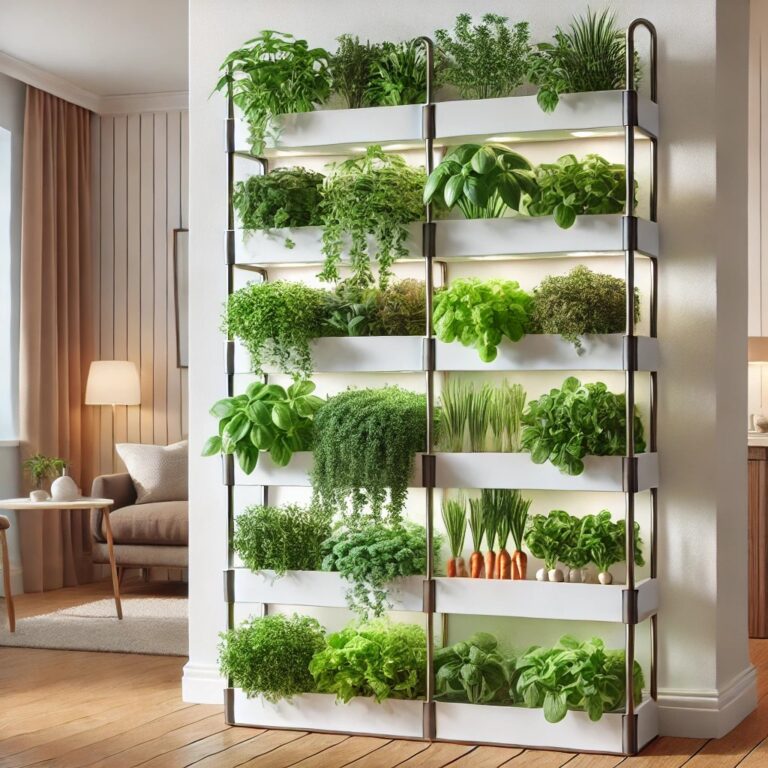
- Home-Complete Walk-In Greenhouse
- The Home-Complete Walk-In Greenhouse is easily assembled with no tools required. It has 8 sturdy shelves that will provide you with plenty of room for pots or planters. It can be used for indoor or outdoor use. You can keep it on your:
- Backyard patio
- Deck
- In the garage
- In the Basement
- It has a PVC cover to help protect your plants from the environment or pests.
- The Home-Complete Walk-In Greenhouse is easily assembled with no tools required. It has 8 sturdy shelves that will provide you with plenty of room for pots or planters. It can be used for indoor or outdoor use. You can keep it on your:
- Palram HGK 125 Snap & Grow Hobby Greenhouse 6X8X7
- The Palram HGK 125 is virtually unbreakable. It has polycarbonate walls and roof. The panels provide 100% UV protection. It will allow 90% light transmission onto plants. It has 53 square feet of space and over six feet of headroom. This starter kit includes:
- Adjustable roof vent
- Rain gutters
- Lockable door handle
- Galvanized steel base
- It has a 5-year limited warranty.
- The Palram HGK 125 is virtually unbreakable. It has polycarbonate walls and roof. The panels provide 100% UV protection. It will allow 90% light transmission onto plants. It has 53 square feet of space and over six feet of headroom. This starter kit includes:
- Mellcom 8X6X6.6 Polycarbonate Portable Walk-in Garden Greenhouse
- The Mellcom Polycarbonate Portable Walk-in has an anti-rust aluminum alloy frame. It comes with a detachable galvanized base that can be anchored in the soil if desired. An adjustable roof vent is used to circulate air. Since this is portable, it is easily assembled and disassembled.
Hopefully we’ve given you plenty of food for thought for your greenhouse flooring (and other construction) strategies. We certainly love ours!
“Little things seem nothing, but they give peace, like those meadow flowers which individually seem odorless but all together perfume the air. .”
Georges Bernanos